
Hi,
In this blog post, I’d like to show you how you can set up and prepare your development environment for AWS using Python and Boto3.
I’m assuming you’re familiar with AWS and have your Access Key and Secret Access Key ready; if that’s the case than great, either set them to your environment variables or wait up for me to show you how you can do that.
1. Python 3
If you already have Python 3 on your computer then you can skip this part entirely. For those who don’t; please go to Python Downloads Page and grab the latest Python 3 version for your operating system. And to make things simpler, get the standalone installer version which makes things a lot easier.
Once you have it, just launch the installer and follow the steps. It’s almost the same for Mac/Windows operating systems and once the installation completes make sure to check the box where it says Add Python to PATH (for Windows users). This is important; otherwise you’d have to do it manually.
Once you’re done with the installation, open a new Terminal window (for MacOS) or Command Prompt (for Windows) and type:
python --version
You should see a similar output like this (your version will probably be different):

Now we’re with Python and next up is to get boto3.
2. Boto3
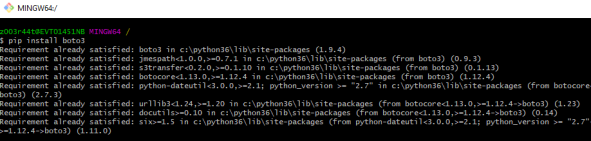
Python comes with the pip, package manager for Python by default. Check if you already have it like below:
pip --version
You should have a similar output to this:

Once we verify that we have pip, we can install boto3 as follows:
pip install boto3
Once you run the command, it should install latest version of boto3. Since I already have it installed, my output looks like below but yours will take some time to collect packages and eventually install it:
3. IDE Configuration
IDEs are varying in features and functionalities and since you’re reading this, you probably have one that you like most. Mine is PyCharm and I think its the best Python IDE out there. If you want to use it or give it a try, go check it out at Jetbrains PyCharm Website , there’s also a free Community Edition available.
So for my IDE, PyCharm, I’ll open up a new project and select the existing Python interpreter as below:
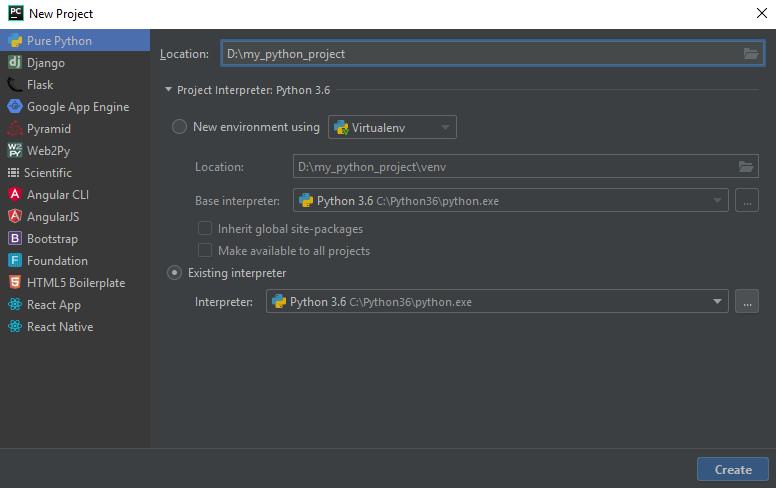
Once you have a similar configuration, now hit Create.
Project window opens up and now we can create our Python package to add our Python files in it. To do that, right-click on your project name and then New -> Python Package:
![2018-09-18 14_42_58-my_python_project [D__my_python_project] - PyCharm (Administrator)](https://niyazierdogan.wordpress.com/wp-content/uploads/2018/09/2018-09-18-14_42_58-my_python_project-d__my_python_project-pycharm-administrator.png?w=840)
Name your package anything you want, I used src in my case. So let’s now create a new Python file following the same procedure by right-clicking and again name it anything you want. I named it boto3_test.py
Once you create your Python file, try to type in the following import statement:
![2018-09-18 14_47_50-my_python_project [D__my_python_project] - ..._src_boto3_test.py [my_python_proj](https://niyazierdogan.wordpress.com/wp-content/uploads/2018/09/2018-09-18-14_47_50-my_python_project-d__my_python_project-_src_boto3_test-py-my_python_proj.png?w=680&h=155)
If you could import boto3 like this than that’s great! We can move on to configure our IDE and write our first lines with boto3.
3.a AWS Credentials
If you have your AWS credentials ready on your environment then you can skip this part to the next. But if you don’t than let me show you how you can do that only for your specific project with PyCharm IDE. To configure your AWS credentials, click Add Configuration.. button on your IDE as below:

Then under Templates section, you’ll see Python when you expand it. Select it and add your AWS credentials under Environment Variables section like in the image above.
Save it preferrably and close the window when you’re done.
Now let’s type in our first line of code and get ready to work with AWS. To do that, you have couple of options with boto3. You can either make use of low-level client or higher-level resource declaration. I’ll show you either way.
In order to use low-level client for S3 with boto3, define it as follows:
s3_client = boto3.client('s3')
Instead, to use higher-level resource for S3 wih boto3, define it as follows:
s3_resource = boto3.resource('s3')
That’s it, you have your environment set up and running for Python Boto3 development. You’re ready to rock on with it!
Have a great day!

One thought on “Working with AWS using Python and Boto3: Setting Up Your Environment”